Sunday, October 23, 2011

Portfolio Entry #2: Depth of Field and Motion

Project Outline


Throughout this project, I will discuss and demonstrate examples of depth of field and motion in photography. For the depth of field section, I will discuss what it is, what factor affects it, and lastly what effect does it have on the photograph. For motion, I will discuss what factors affects it, the different types of intentional motion blurs, how to take them, and lastly what affect it has on the photo.


Depth of Field


Class Notes


Definition


Depth of field can be described as the amount of distance between the nearest and the farthest objects that appear on acceptably sharp focus, or in other words, it is how deep the area in focus is. Depth of field can be classified under shallow and deep. Shallow depth of field has a small area in focused and deep depth of field has a large area in focused. 


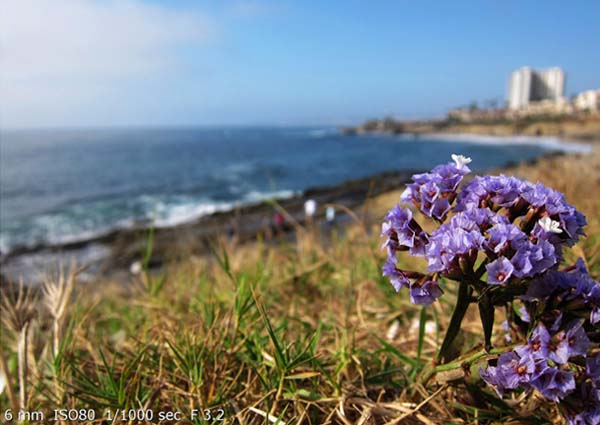
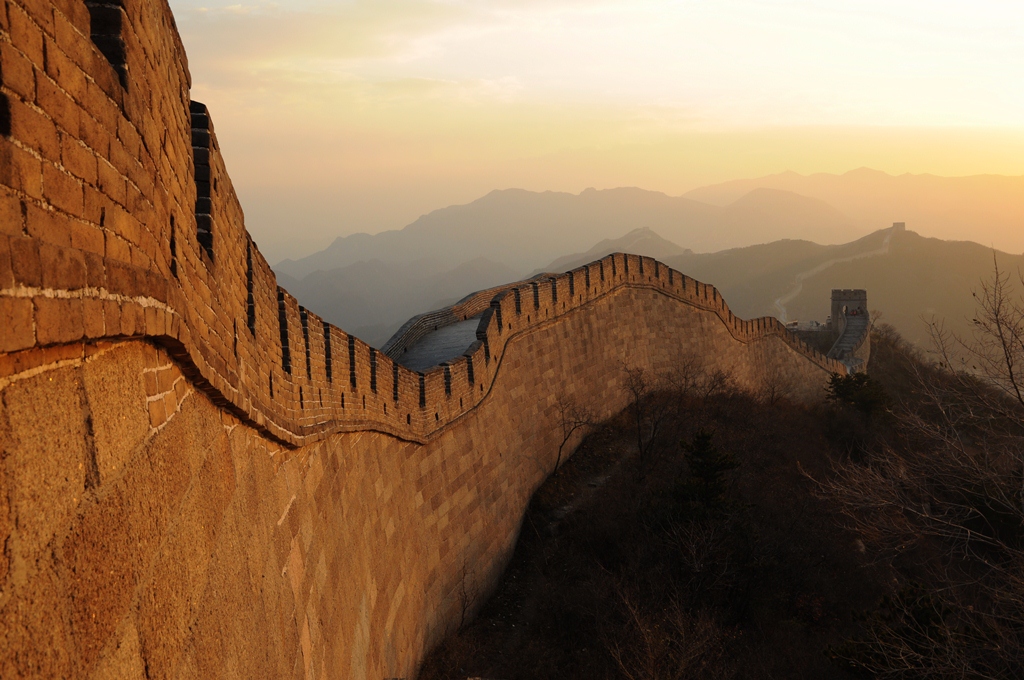
This photo is an example of large depth of field. As you can clearly there is a large area in focus, with both the yellow tube and the tree are in focused. The photographer would probably had taken this with an f-stop of 22, meaning that it is taken with a small aperture opening. 


This photo of my turtle is an example of shallow depth of field. The area in focused is shallow, focusing only on the face of the turtle. The area that is not focused on can be seen by the blurry background. This photo was taken with an f-stop of 5.6, meaning that it was taken with a large aperture opening. 

Influencing Factors

The three most important influencing factors are 
  1. Aperture

    The aperture can be defined as the opening of a camera to let light pass through. The smaller the f-stop, the bigger the diameter of the aperture. Therefore, if a photo was taken with an f-stop of 5.6 it means that the aperture's diameter is large, resulting with shallow depth of field. And if a photo was taken with an f-stop of 22 it means that the diameter of the aperture is small, resulting with large depth of field.

  2. Lens focal length 

    The lens focal length can be changed by turning the lens of the camera. The more the camera is zoomed onto an object, the shallower the depth of field will be. But if the camera is not zoomed it has a larger angle of view, resulting with a large depth of field.

  3. Shooting distance

    The shooting distance is the distance from the camera to the subject in focused. The same concept for lens focal length can be applied here as well. The shorter the distance, the angle of view becomes more limited. This means that it will have a shallow depth of field and visa versa for the longer distance. 


Why Depth of Field?

Depth of field can be used for many reasons. For example, if the photographer wanted to focus on someone's face, he or she would use a shallow depth of field in order to blur out the background, avoiding distractions, and only having the face in focused. Therefore, we can say that shallow depth of field can be used for portraits photographies, to avoiding distractions from the background, and to bring all focus on the subject. 


Another reason can be to include all possible detail there is at the scene. This can be achieved by taking the photo with a large depth of field. By doing this, everything on the photo will be clear, having all focus on the photo as a whole. Photographers may use this for landscape photography. 


Motion


Class Notes


Definition


Motion can be defined as the movement of an object. Photographers can used photography to capture motion by either intentionally blurring it (by having a long shutter speed) or totally putting the motion to a stop (by having a fast shutter speed). 


This photo is an example of motion blur. The stand of the machine is still, whereas the people on the swing are al blurry because they are moving. The photographer must had taken this photo with a long shutter speed, because if the shutter speed was fast then the people on the swing would come to a stand still.


This photo is an example of a motion stand still. The person who is jumping has froze in mid-air. The photographer must had used a fast shutter speed in order to capture the motion quickly without blurs. 


Influencing Factor


Shutter speed- shutter speed is probably the most important factor in capture motion. If we want blurs in our photos, then the shutter speed should be set as long depending on how much blur you want. Whereas if we want a motion that is completely still, we must use a fast shutter speed to avoid capturing any blurs in the motion.


Types of Motion Photography


Panning


Panning is a common method used in motion photography. It is when photographers move the camera left or right at the same pace as the subject, only focusing on the subject. This way, the subject will be clear, whereas the background blurred. Panning should be taken with a long shutter speed, at about 1/15 of a second or 1/8 of a second.
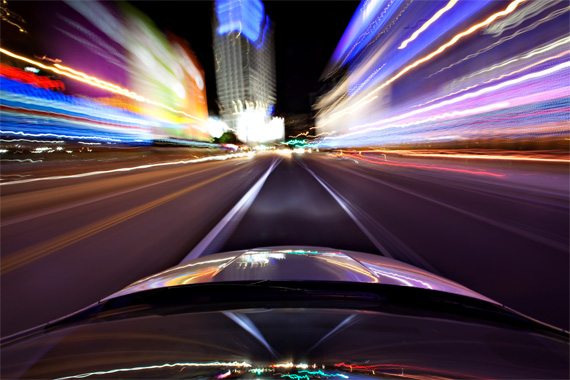


Pull Zooms


Pull zooms is another method used in motion photography. It is when photographers zoom into the subject after they press the shutter and during the aperture is opened. This way, the subject will be in focused whereas the surroundings are blurred. Pull zooms should be taken with a long shutter speed as well, at about 1/15 of a second.


Subject Motion


Subject motion is another method in motion photography that is commonly used. This effect is created when the camera is put in a stand still, and letting the subject move. This way, the subject is blurred whereas the background is still (kind of opposite of panning, where the subject is in focused and the background is blurred). Subject motion should be taken with a long shutter speed as well, depending on how blurry you want the subject to be. Although, the shutter speed should generally be slower than 1/60 of a second.
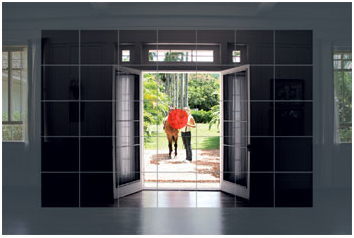


Camera Shake


Camera shake is when the photographers shake their camera while the lens is still opened in order to create an intentional blur. This way, the photographer will create motion throughout the whole photo, with nothing in focused. Camera shakes should be taken with a long shutter speed as well.


Researched Notes & Demonstrations


  1. This website, http://www.cambridgeincolour.com/tutorials/depth-of-field.htm, helps demonstrate and understand a lot about depth of field in photography. It gives a scientific explanation and conversions for using depth of field for shooting photos and depth of field. 
  2. Other websites I found helpful were these websites, http://www.digital-photography-school.com/a-beginners-to-capturing-motion-in-your-photography & http://www.digital-photography-school.com/how-to-capture-motion-blur-in-photography. These help demonstrate, understand, as well as how to capture different types of motion blurs. It tells us what the best settings are to use in capturing motion. 
  3. This website, http://www.smashingmagazine.com/2008/08/24/45-beautiful-motion-blur-photos/. This website gave me a lot of inspirational ideas on how to capture my motion pictures. 
Contact sheet

 Depth of Field


Motion


Final Selections

Depth of Field


Motion


Description of Learning

I truly enjoyed the motion and depth of field unit because I thought that it was really fun and easy to take. I found it really enjoyable because I can be really creative with what I take and my pictures came out the way I imagined them to be. I thought that depth of field was fun to take because I could turn any ordinarily object interesting. I learnt many things during my motion takes because I learnt how to take them properly with the correct ISO settings, shutter speed and etc. In conclusion, from this unit I had developed my photography skills further and learnt how to properly take motion photos.

Development Options

I believe that I could develop more on my motion photos by taking more and having more types of motion photography. I also would like to develop more on my depth of field. Sometimes when I try to take large depth of field photos it turns out boring. Therefore, I want to be more creative with taking my photos. 

Monday, October 3, 2011

Portfolio Entry #1: Introduction to Digital Photography & Composition

Project Outline

This assigned project will consist of two sections, the introduction to digital photography and composition. For the first section, I will discuss about the different camera modes, the different metering modes, and the histogram. For the second section, I will introduce the important compositions of photography.


Introduction to Digital Photography

Class Notes & Research

Camera Mode (PSAM)

Program Mode
                     
Under this mode, the camera will choose the shutter speed and aperture for you based on the amount of light that passes through the lens. When using the program mode, control of the exposure is very limited. This mode is very similar to auto mode, but unlike auto mode, we can control other functions such as flash, the white balance and the ISO setting.

Since the program mode is somewhat automatic, it is useful when it comes to quick, point and shoot situations. Although, the program mode should not be the preferred mode to use in photography, since there is a high chance of getting an underexposed or overexposed photo while shooting under this mode. Some photos shot in P mode can be seen below:


Shutter Speed Priority Mode

Using this mode, we have the control over the shutter speed while the camera chooses the most suitable aperture depending on the light that passes through the lens. This mode is mainly used to freeze motion or intentional blur them.

Shutter speed priority is useful when the photographer is trying to freeze quick motion such as a sport tournament or a running dog. This can be achieved by shooting with a fast shutter speed (such as 1/320 or 1/3200 of a second), resulting with a large aperture opening and limiting the depth of field. On the other hand, the photographer may want to shoot blurred motions such as the movement of water or the motion of a hummingbird’s wings. This can be achieved by shooting with a slow shutter speed (such as 1/1.3 or 1/4 of a second), resulting with a small aperture and large depth of field. Some examples of photos shot in S mode can be seen below:


Aperture Priority Mode

When using this mode, we have the control over the f-stop which the camera processes the shutter speed. This mode is suitable when the photographer wants to focus on depth of field, since the size of the f-stop determines the depth of field.

This mode is useful when the photographer wants to isolate their subject by blurring its surroundings or if they want to include every possible detail in that scene. A small f-stop (such as f/3.5 or f/5) will have a big aperture opening, resulting with a large depth of field. A big f-stop (such as f/16 or f/22) will have a small aperture opening, resulting with a shallow depth of field. Photos shot in A mode can be seen below:


Manual Mode

This mode is the recommended mode where 50% of our photos should be taken with. By using this mode, we have the ability to control the shutter speed and the aperture. This is most suitable when you need full control of exposure in the scene. Underexposed and over exposed photos can be deliberately shot under this mode as well.

This mode is useful all round, especially when shooting panoramas. Although it may take a while to figure out the best setting for the each photo, but when it is figured the exposure will be accurate. For example, when shooting panoramas the manual mode will help achieve the same exposure for every photo, therefore there will be no darker or lighter sections. Examples can be seen below:


Further research: http://www.lensandshutter.com/wayne.lasso?article=8


Metering


Matrix

Matrix metering has the ability to analyze all the light within the entire frame and give the average exposure. Matrix metering is quick and easy to shoot. But sometimes, the matrix metering can give good results, but if it can also make white and black greyer than usual. Therefore, centre-weighted or spot metering should be used more often than matrix metering. An example can be seen below:


RESULTING WITH:


Centre-weighted

Centre-weighted metering has the ability to meter the frame but give weight to the central area of the scene. It is between matrix metering and spot metering. The meter of center-weighted metering does not meter everything in the frame like matrix metering, and has a larger focus area than spot metering. Centre-weighted metering is useful in terms of difficult lighting conditions, because it gives the option for us to narrow down our focus point.

For example, if a pale-skinned woman was to take her photo in front of a black background and you were to use matrix metering, chances are the skin of the pale woman will be darker than it is. If centre-weighted metering was used, it will allow the photographer to be able to focus on the colour of the woman’s skin having it at the right colour. However, if the subject was constantly moving, it can be hard to meter. An example can be seen below:


RESULTING WITH:


Spot

Spot metering has the ability to meter a very small spot in the scene. It is probably the best metering mode to use because it can deal with difficult lighting situations. Spot metering allows you to have the right exposure when the main subject of the photo is either lighter or darker than the majority of the background. Although, spot metering will be extremely hard if the subject was far away and/or the subject is constantly moving. An example can be seen below:


RESULTING WITH:


Further research: <http://www.digital-photography-school.com/introduction-to-metering-modes>, <http://land.allears.net/blogs/photoblog/2008/05/photographic_innoventions_mete.html>, <http://www.december.com/john/photography/meteringmode.html>


Histograms

Histograms are graphs that provide a quick overview of a picture’s tonal range. Histograms are present in cameras and photo editing applications (such as Adobe Photoshop and Lightroom). It is very useful for photographers to check the histogram after each shoot to see if the photo is underexposed (too dark) or overexposed (too white). If the photo is too dark the graph will skew to left, and if the photo is too white the graph will skew to the right. Most of the time, if there is a spike on either of the far ends, it means that the photo is over/underexposed to the point that it loses detail. 


This histogram is a screenshot from Lightroom and shows the tonal range for the image above. The graph is mainly skewed to the left, meaning that the picture is mainly composed of dark tones.


Further research: http://www.digital-photography-school.com/understanding-histograms


Design Elements & Composition

Class Notes


Design Elements


Composition

Composition can be defined as an arrangement of the parts of a work to form a unified, harmonious whole. Those arrangements can be composed of design elements such as lines, textures, forms, shapes, and colour. The arrangement of these elements will identify the idea that the photographer wants to share with his/her audience.

Lines

Lines can consist of:
  • -       Straight
  • -       Curved or S shape (implying quiet, calm, and sensual feeling)
  • -       Vertical
  • -       Horizontal
  • -       Diagonal
  • -       Zigzag
  • -       Oblique (implying movement, action and change), and
  • -       Converging lines (imply depth, scale and distance)

Lines have the ability to lead the audience’s eyes to where the point of focus is. Some examples of line photography can be seen below:


Form


Form depends on the 3-dimensional feel that the object gives by having contrast between its light and dark areas. The light and dark area also suggests volume. The direction of the light source can alter our feelings towards the image. 


Researched Notes & Demonstrations

  1. This website, http://www.photographyicon.com/line/, will helps demonstrate a better understanding on how lines are used in photography. It also explains how the different type of lines can make us feel.
  2. Another website that i found helpful was this website, http://www.photography-basics.net/photo-composition-shape-form-pattern-and-texture.html. This website explains what composition and the design elements are and what they can look like. 
Images


Camera: Canon EOS-1D Mark II
Focal Length: 200 mm
Shutter speed: 1/250 sec
Aperture: F5.6
ISO: 640

I found this photo on DP Review (http://www.dpreview.com/challenges/Entry.aspx?ID=505691&View=Results&Rows=4) and thought it reflected ideally of forms. The steam of the locomotive has a contrast of grey and black, making it appear 3D. The shadow of the steam helps exaggerates the form of the steam, giving it even more contrast.


Camera: Nikon D90
Lens: Nikon AF-S DX Nikkor 16-85mm F3.5-5.6G ED VR
Focal Length: 20 mm
Shutter speed: 1/160 sec
Aperture: F8
ISO: 200

I found this photo on DP Review (http://www.dpreview.com/challenges/Entry.aspx?ID=512499&View=Results&Rows=4) and thought that the Great Wall of China depicted a nice demonstration of leading lines. When I first saw this photo, my eyes began at the left side of the photo and ran through with the rest of the wall, up till my eyes reached the mountains. 


Contact Sheet

Lines


Forms


Final Selection

Lines


I chose this photo as one of my final selections for my lines project because I wanted to demonstrate a line without “lines”. In this photo, the repetition of the black swing seats, the silver chains, and the red swing bars create a form of leading lines. The line leads to the green field at the far back of the photo. The black swing seats starts at the bottom third of the photo, then leads us up to the middle section of the photo. The division between the sand and the grass field divides the photo into two. I like this photo because of the different colours that is present as well. All the colours of the objects in this photo stands out greatly from each other, making the leading lines more visible. 


This is the second photo I chose for one of my final selections for lines. This photo is a photo of my dog sleeping. I chose this photo because lines are not the main focus in this photo, but my dog is. Instead, the lines are the contributing factors that make this photo valid to be under the lines category. This is an example of leading lines and diagonal lines. The pale orange lines of the bed start from the bottom-left corner of the photo and lead our eyes diagonally to my dog.  I like how the background also consists of lines, but are not in focused so it only brings our attention to my dog. 


Forms


I chose this photo as one of my final selections for my form project because I wanted to demonstrate my understanding of the importance of shadows in form. Form basically means the contrast of black and white within an object. In this photo, I had placed my lantern by the window, which in return gave me natural lighting. The lighting of the window magnified the contrast of dark and light within statue, which overall created the concept of form. I also liked the angle that I shot this photo with. The legs of the statue filled the bottom and half the right side of the photo, creating the whole bottom-right corner. I shot the photo in a high angle, so that I am looking up at the statue, giving it an almighty feeling.


This is the second photo I chose for my forms project. Once again, I mainly chose this photo to emphasize on the darkness and the lightness of the object, which I believe I have demonstrate clearly in this photo. Once again, naturally lighting is used to magnify the form of this statue, exaggerating the form of the statue even more. However, this photo has a higher contrast than my previous photo because the cut between dark and light is more abrupt. This can be seen on the clothing of the statue. I like this photo because the colours of the statue and the colours of the window are such in contrast. The colours of statue mainly consists of dark, dull tones, whereas the colours of the window consists of light, green tones and with the help of the colour of the blinds makes it a more lively colour.

Description of Learning

I found the Introduction to Digital Photography and Composition course enjoyable and extremely useful because it really taught me the concepts of photography. Before this course, I always used the auto mode and never really used all the functions of the camera. Usually, if the photos that I took with auto mode turned out poorly, I always edit them on photoshop. I never had experience using the PSAM mode or the different metering mode before this course. I never knew what a histogram was and I never checked it after I went out to shoot photos. Now that I took this course, I learnt so many tricks and tips about my camera and can finally use my photography skills to shoot good quality photos instead of editing them on photoshop. I can instantly analyse my photos' exposure with the histogram on the camera instead of uploading them on the computer and analyzing them to see if they turned out good or not. I learnt a lot about the relationship between the shutter speed and the F-stops so I can apply that knowledge in my photo shooting skills. 

Learning about compositions and the different design elements really inspired me to be more creative with what I shoot. Before this course I usually shot photos to "record" what I see. Now that I have more knowledge on composition and the different design elements, I can portray my ideas and vision in a more creative method. This improved my photos greatly, because now they are more interesting and unique.

After this course, I believe that it has improved my knowledge and understanding of photography greatly. It has allowed me to learn and test the different functions of the camera that I had never used before. This course has truly expanded my skills in shooting photos and portraying them.

Development Options 

If I had the chance, I would like to go over the concept and use of the different metering modes. I believe I have a good understanding of them, but when I go out and shoot photos sometimes I am correct with my meter settings and the photos turned out good, but sometimes I think that I am correct with my meter settings but the photos either turned out underexposed or overexposed. I would also like to revise about the reciprocals of shutter speed and aperture to further improve on my photography skills.