Sunday, November 27, 2011

Portfolio Entry #4: Flash Photography

Project Outline


For this project, I will demonstrate my understanding of flashes through a variety of photos using different flash techniques. For our partner work, we chose to use paintbrushes and other stationaries as our still life. I used my friend as a model for my individual flash shots.


Class Notes, Researched Notes & Demonstrations


1. On camera bare flash
This is when the flash is directly on top or connected to the top of the camera like a normal flash. The light is directly aimed at the object, lighting up the front and forming shadows at the back. It gives the objects a 2-dimensional feel and makes the objects appear very plain.
2. Off camera bare flash
This is when the flash is disconnected from the camera and is free to move around the object. The light can be aimed from anywhere and at any angle. According to this photo, the light is aimed towards the bottom left of the subject, as the shadow is slightly casted right behind the subject. This creates form within the photo, as we can see both the light areas and dark areas of the subject, and creating a 3-D feel.


3. Off camera with reflector
This is the same as off camera bare flash, however the flash was directed at an umbrella opening that was made of metallic material and the umbrella opening was directed at the subject. This way, the light on the objects will appear weaker and softer, making it stand out vaguely from the dark background. The lighting in this photo was from the right side, creating very faint shadows on left side of the subjects. 


4. Diffused flash
This is when the flash is directed under a white umbrella, and the top of the umbrella was directed at the subject. The umbrella acts as a huge, but soft, spotlight directing at the objects and lighting them softly. However, the lighting appears to be stronger than when the reflector was used. The umbrella was directed from the front left of the objects, outlining the left sides of each object harshly while leaving their right sides fading into darkness.


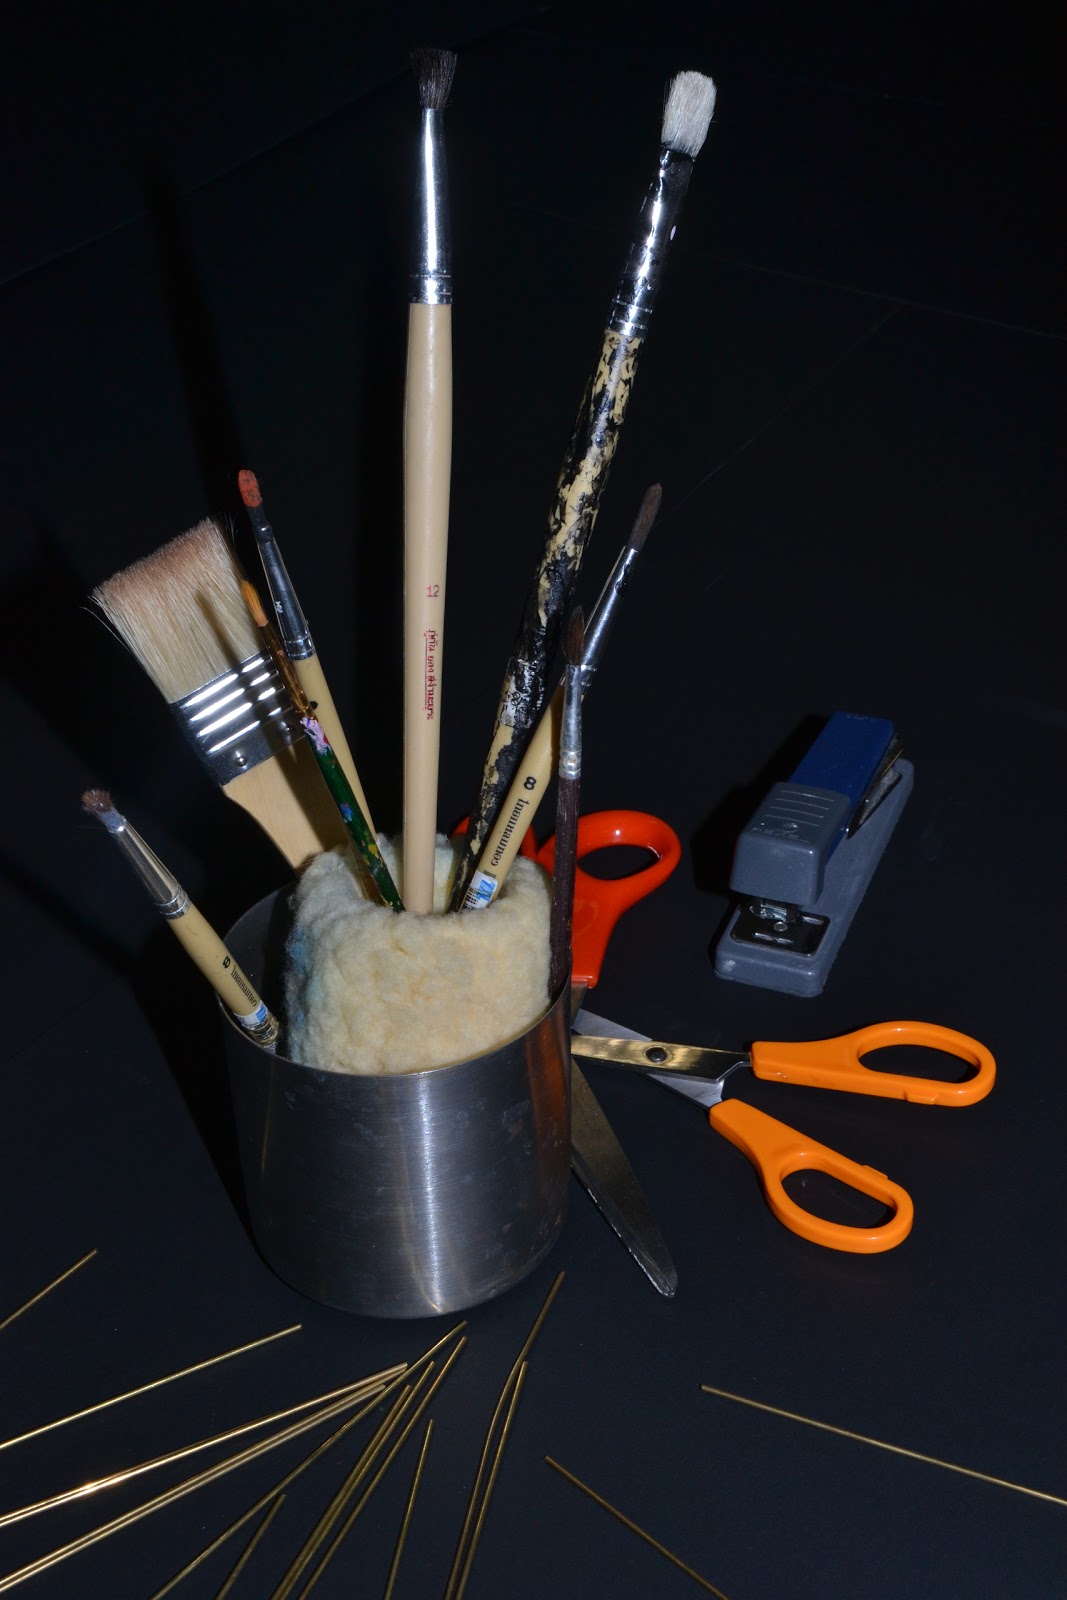
5. Snoot
This is when a snoot or a box is placed around the flash, limiting the area of which the flash can light up. In this photo, a snoot was used to light only the centre of the setup. The snoot was directed from the right side of the objects, making the shadows of the paintbrush fall on the other. The scissors and the metal sticks are very slightly lit, as the light source is reflected from the cotton. 


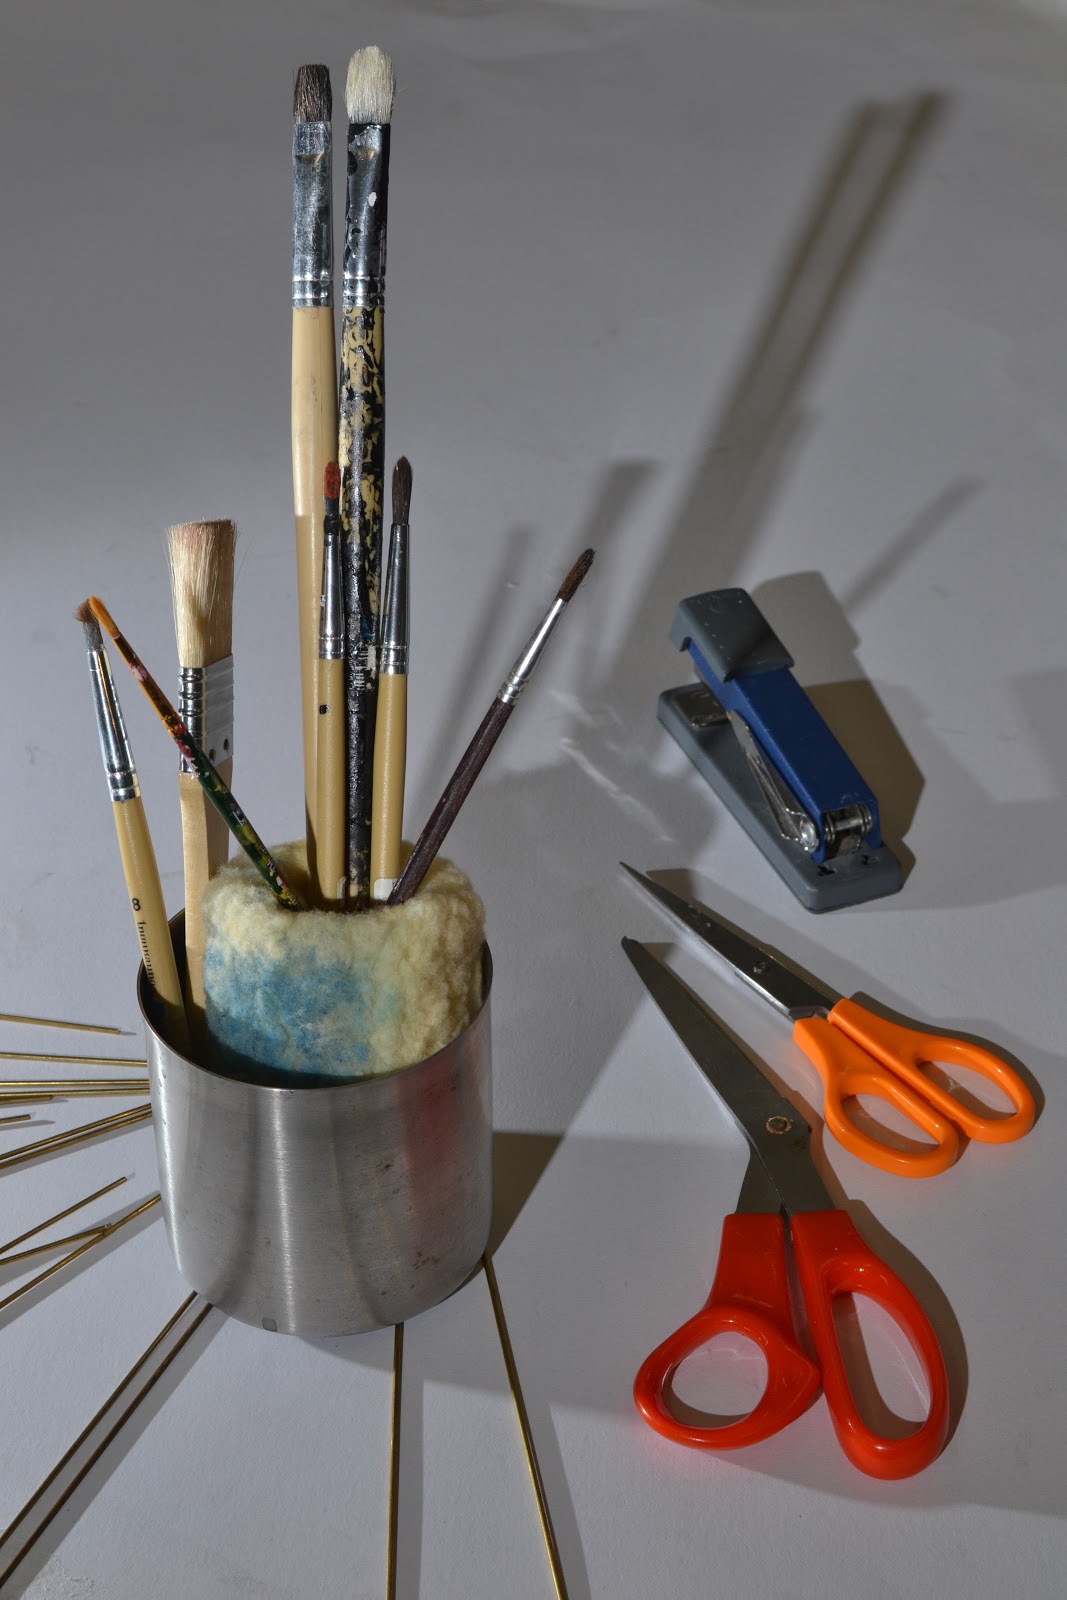
6. Grid
This is when the flash is aim through a a circular tool with a beehive-like pattern. This has the same effect as the snoot, as both tools limit the area where the flash can hit. However, as the snoot has a more direct and smaller lighting area, if the flash was aim through the grid further away from the objects, it will have a larger lighting area and visa versa. The flash was aimed from the front left of the objects, creating a nice shadow running from the object to the top right of the photo. This was shot on a white background to emphasis the shadows. 


7. Flag
This is when something is used to cover a side of the flash. This way, when taking the photo the light will not hit the side that the flash is covered. In this photo, the light was directed from the back left of the subject, and the flag was covering the left side of the flash. The line behind the objects is the result of doing so. 


8. Cookie
This is when the flash is aimed through something that has an interesting pattern on it. This is to create a pattern on the photo using light. In this photo, the flash was aimed slightly left of the objects through a basket. This results with a stripy background created by shadows of the basket. This cookie can be used to portray the composition of lines and patterns.


9. Gel
This is when the flash is covered with a coloured glass paper, or gel, in order to create colour. In this photo, two techniques are used; gel and multiple flashes. One flash was covered with a blue gel and the other was covered with an orange gel. The blue flash was placed behind the objects to their right, and the orange flash was placed 180 degreed opposite of the blue gel. When the photo was taken, the blue flash lit the back of the objects, leaving the shadows of the objects to be filled with the orange flash, resulting with this photo. We chose blue and orange to demonstrate opposite colours.


10. Multiple Flashes
This is when two or more flashes are used to take the photo. Using this technique, multiple shadows can be created as well. Since shadows are the main product of this technique, the objects were placed on a white background to emphasize their shadows. A flash was placed in front of the objects, slightly to the left and the second flash was placed on the left of the object. When shooting using this technique, two tones of shadows are created. The individual shadows for each flash appear lighter than the shadow where the shadow for each of the flashes intersect. 
Contact Sheets


Final Selections

While researching ideas on how to shoot my flash photos, I was really inspired by some portrait photographs using flashes and studio lightings. In order to shoot my individual flash photography project, I had to use my friend as the model. We used the studio because I wanted my shadows on white background, since white emphasizes black shadows. I shot this photo while having the flash on the left side of the subject, parallel to his face in order to capture the shadow in the frame. I chose this photo because I liked how the shadow on the white background outlined the whole face and head. I also liked how my friend appears to be minor whereas his shadow takes up the whole white space. This is a demonstration of effective use of shadows to erase white space. 


One of the most important element in portrait photography is the subject's eyes.  I like how the flash makes it his eyes clearer. I shot this photo while having the flash left of the subject. Because he is looking away, I was able to use the light to highlight his jawbone and eye socket, making the photo appear 3 dimensional because of form. The crop of this photo makes it much more interesting to look at, since there is not many white spaces. This photo is a demonstration of how flash can be used to outline features of the face. 


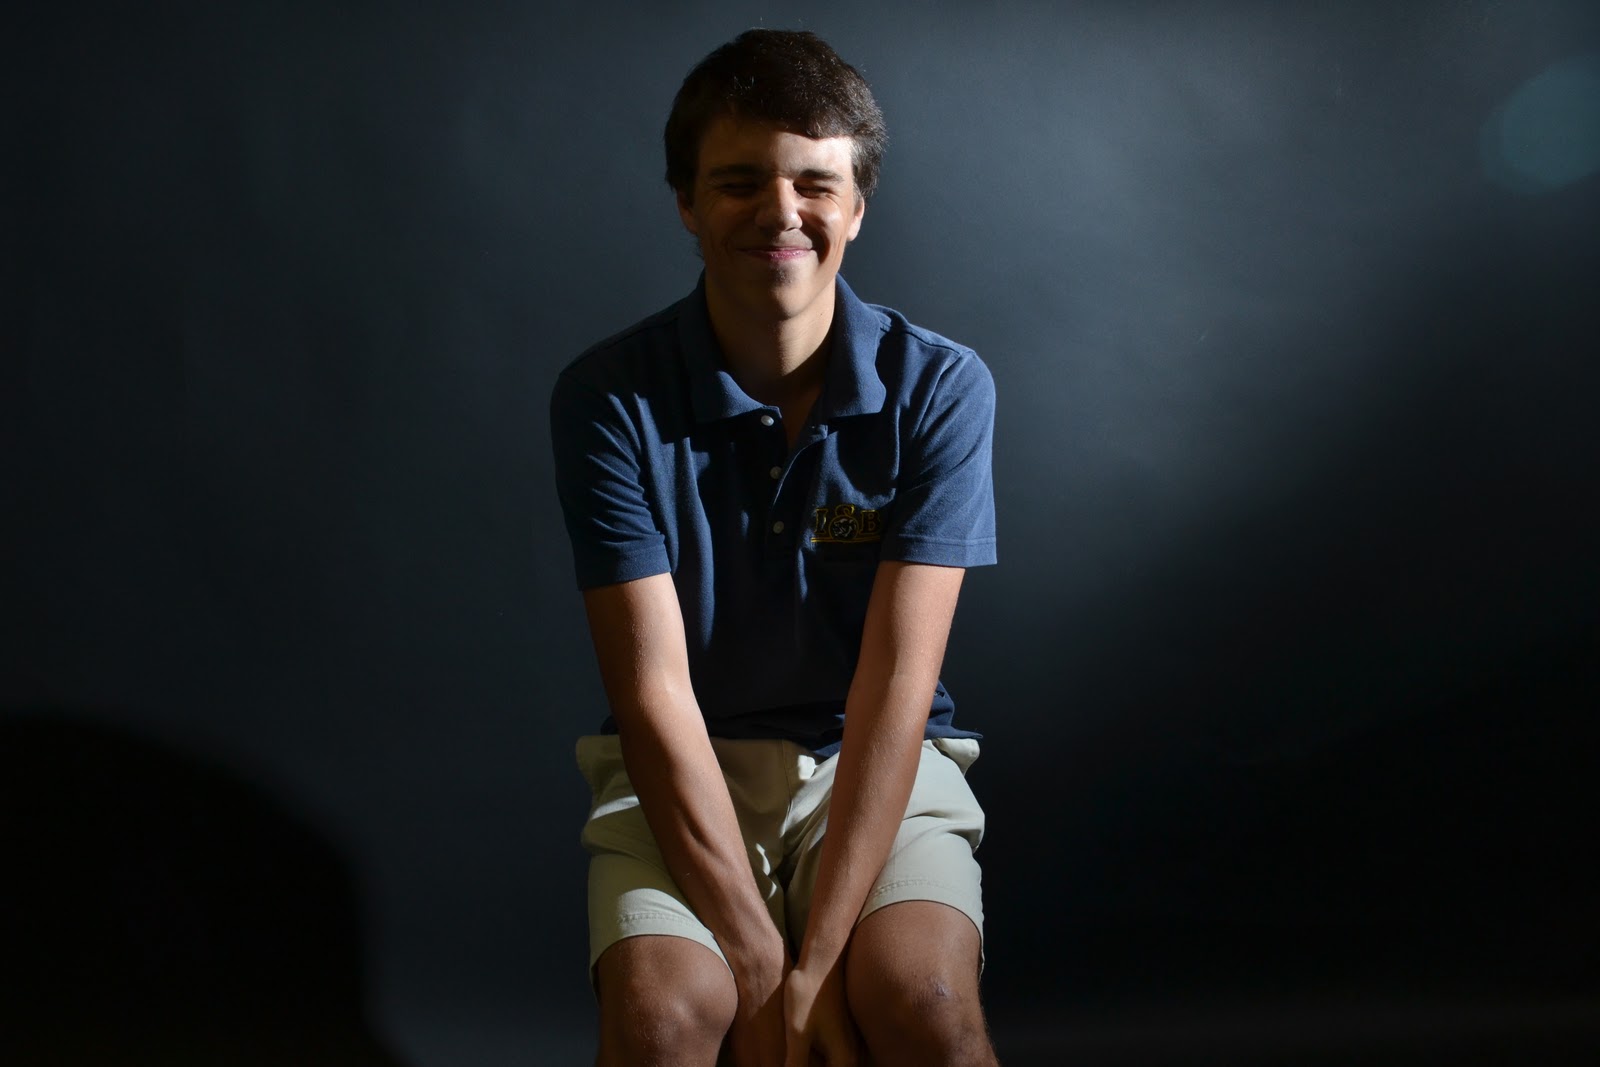
I like this photo because the flash drew a line down the middle of his face and arms. I shot this photo while having the flash on the right of the subject. The right side of his body is all lit, whereas the left side of his body is shadow. I used a black background because I did not want to focus on the shadow that is formed on the background, but I wanted to focus on the shadows that are formed on his face and body. In addition, the line that the flash drew on the right side of the photo acts as a leading line towards the main subject. 


Description of Learning


At first, I thought that this unit was going to be boring. But as I shot my photos and was able to try out different techniques, I really enjoyed this unit. I love how I was able to play with the shadows to create composition and that I was able to create "art" through it. I learnt how to use flash in sync with the camera and how moving the flash further makes the shadows harder and vise versa. I learnt many new techniques throughout this unit and thought that working with a partner was really enjoyable as well. I thought that this unit was a good unit to end the semester and I believe that I enjoyed with unit the most. 


Development Options


I thought that my time organisation for this unit could had been improved upon. This is because I had to take my individual project on the very last day we had our camera. If I had more time to work on my individual project then I believe I could had end up with much better and interesting photos. I wanted to try out the different techniques of flash photography in my portrait photographs so I could see how different from one another they could had turned out to be, but unfortunately I was only able to use gels only. 

Portfolio Entry #3: Singular Theme and Composition


Project Outline

For this portfolio entry, my photos will be focused around the theme “Earth”. Through photography, I will demonstrate my understanding of the different compositions we had looked in class. I will also be explaining what the different concepts in compositions are.

Composition

Class Notes

So far in class, we had been looking at these concepts in compositions:

·            Attractions and distractions

o   Bright Areas
§  Draws attention- therefore can become a distraction or an attraction depending on what the focus point is
§  Should be careful when taking photos to not have any unnecessary bright areas

o   Colour Contrast
§  When colours are opposite on the colour wheel
§  Can be used to separate the subject in focus from analogous colours
§  Therefore, can become both an attraction and a distraction (only if there are unnecessary high contrasts in the photo)

o   High Contrast
§  When the tone of the subjects are very different (like black and white)
§  Can be used to draw out subjects or features

o   Areas of Sharpness
§  The areas in sharp focus usually attracts our attention
§  Usually used with shallow depth of field in order to create a blurry background

o   Eyes of People or Animals
§  Should be very sharp and clear
§  Should be the main focus point in a portrait

o   Colours in a Monochromatic Scene
§  Can bring attention to the subject which has colours that are different from the monochromatic scene

·            Elements of Composition

o   Line
§  Straight
§  Curved or S shape (implying quiet, calm and sensual feeling)
§  Vertical
§  Horizontal
§  Diagonal
§  Zigzag
§  Oblique (implying movement, action and change)
§  Converging lines (imply depth, scale and distance)

o   Form
§  3-dimensional feel that the object gives
§  Contrast between its light and dark areas
§  Suggest volume

o   Texture
§  Helps emphasize the features and details
§  Can help create form
§  You know how the object “feels” like

o   Contrast
§  The light and dark tones of the photography
§  High impact

o   Movement/Motion
§  Slow shutter speed à more blur
§  Fast shutter speed à freezes motion

o   Positive and Negative Space
§  Negative spaces are the plain spaces
§   Can draw attention to the subject by having it in plain space

·            Subject Placement

o   Eye movement
§  The things your eye looks at/or stops at when looking at the photograph
§  Best to place subjects where the eyes can move throughout the picture quickly and rest at the main subject

o   Golden mean
§  Or the golden ratio which is 1:1.6

o   Rule of Thirds
§  A grid used in photography
§  Two parallel vertical lines and two parallel horizontal lines dividing the picture equally into 9 sections

o   Proper Balance
§  It is the visual weight
§  The subject on top feels like falling
§  The subject on bottom feels settled

o   Framing
§  Relevant to the picture

Researched Notes & Demonstrations

  1. 1.     I found this website, http://www.photographymad.com/pages/view/10-top-photography-composition-rules, really helpful when I was trying to understand composition better. It explains what the compositions are and give many examples for each.
  2. 2.     Other than that, I found this website, http://www.digital-photography-school.com/getting-backgrounds-right, was really helpful when it comes to dealing with distracting backgrounds. It tells you what the distractions are and how to avoid them.
  3. 3.     This website, http://www.digital-photography-school.com/fill-your-frame, was really helpful because it demonstrates how to effectively fill your space
  4. 4.     This website was helpful if you want to know what the attractions and distractions are, http://jarviestudios.com/blog/tag/attractions-and-distractions/
  5. 5.     I believe that this website, http://www.hongkiat.com/blog/positive-effect-of-negative-spaces-in-photography/, really taught me how to use negative spaces to create a positive outcome.

Earth


By "Earth", I mean all sorts of mountains, trees, flowers, the sky, or anything that occurs naturally. Therefore, I had to research some techniques dealing with nature, landscape, and some outdoor photography.


Some images that were really inspiring:


A really good website on nature photography is, http://www.naturephotographers.net/


Landscape


Brief explanation on how to take landscape photography

  1. Maximize your depth of field (small aperture)
  2. Use a Tripod (incase you have to take it with a long shutter speed)
  3. Look for a focal point (people, buildings, silhouettes and rules of third should also be applied)
  4. Think foregrounds (need to have a sense of depth)
  5. Consider the sky (bright, happy colours and clouds; always include the sky)
  6. Lines (can be the horizon, the road, etc)
  7. Capture Movement (if can will add drama, mood and create a point of interest. E.g.- wind in trees, waves on beach, waterfall)
  8. Work with weather (a scene can change dramatically depending on the weather)
  9. Work the Golden Hours (shooting at times around dusk and dawn will definitely make the photo come alive)
  10. Think about horizons (rules of third)
  11. Change your POV (shoot the same subject from a different angle)

Nature

Brief explanation on how to take nature photography
  1. Learn to see the light (look for interesting combinations of colour, light, shadow and texture)
  2. Try new perspective (get close, get far, look up, look down, look behind, so forth)
  3. Get as close as possible to your subject (fill up the frame)
  4. Use a tripod whenever you can 
  5. Do no harm to the subject

Outdoor

Brief cautions with taking outdoor photography

  1. Bring extra suplies (prepare for the day; bring lunch, water, extra batteries, etc)
  2. Pay attention to your surroundings (look where you're going, if its too dangerous, dont risk it)
  3. Avoid taking outdoor photographs in extremely cold of hot weather (it can damage your camera)
  4. Never shoot directly into the sun

Contact Sheet


Final Selections


I chose this photo since a lot of composition can be seen here. The rule of thirds can be applied in this photo because the land occupies the bottom third with the sky occupying the top first and second third. The grey-ness of the cloud shows form as well as creating contrast with the bright blue sky. I like how I can sense a great deal of power by looking at the clouds. I feel like the clouds are taking over the sky and the land and has a bit of a volcano eruption feel to it. I also like the different variety of colours that are visible within the photo. 


I chose this photo because there is an eerie and scary mood to it. Nevertheless, there are many lines visible here as well. The standing trees create vertical lines and the half-fallen tree clashes with the pattern by creating a slanted line, making the photo more interesting. When I took this photo, there was a great amount of wind blowing on the trees. I liked how the leafless trees stood really still whereas the trees which do have the leaves shook. Therefore, motion is also seen in this photograph. I had cropped a little bit of the bottom part of this photo because there were some bushes and grass on the ground and a little hut on the bottom left. I saw those as distractions so I cropped them out. By cropping them out it also created a panoramic taste to this photo. 


Since my previous photos were taken with a large depth of field, I chose this photo so I can demonstrate shallow depth of field. Since the plant had quite a lot of distractions behind it, by using a shallow depth of field it allowed me to focus on only the plant by making it sharp. I like this photo because I thought that the colour of the plant contradicted with the colour of the tree trunk. I can also see many textures within the photo, with the leaves being smooth, the moss being spiky  and the trunk being rough.

Description of Learning

I thought that this project was really free-style and I was able to learn on my own because I got to choose my own theme and composition. I was really lucky to be able to choose my own theme during my evacuation trip to Chiang Dao because I was able to take photos of what I am passionate about (nature photography). I applied my knowledge of composition while taking these photos as well as other techniques that we had learnt throughout this course, such as depth of field and motion. By learning the concept of attractions and distractions, I was more aware of the background whenever I took a photo, resulting with a better quality photo. Not only that but I thought that this project was fun because we didn't need to focus on only one composition but we got the chance to explore all of them.

Development Options 

Even though sometimes I believe that my photo skills are perfectly fine for someone at my stage, but I know that there is always something that needs to be developed on. Throughout this project, I had discovered that I usually like to take my photos in the same style and layout. For example, if I thought that placing the ground on the bottom third looked good, I will always place ground on the bottom third. I believe that I should be more open-minded and have more points of view when taking a photo.